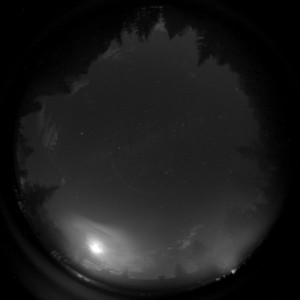
The biggest problem with processing images from the all-sky camera is on nights when there is significant moon in the sky. The camera delivers 16 bit fits frames, and a normal type of image stretch when converting the fits frame to a jpeg for web display essentially leaves a bright moon, with no other details to be seen. After a bunch of experimenting with various types of image stretch, I came up with this, which I believe is a fairly good rendition of the all-sky shot. It has a half moon in frame, exaggerated by light clouds in front of the moon which creates significant scatter, as well as some bright lights at ground level. But, in the same image at the center of the frame, we still have faint traces of the milky way visible in this shot. I’m happy with this rendition because it’s a rather good overall view of the sky in what amounts to very poor conditions. We had a bright moon, with a very wispy set of clouds over a lot of the sky. Standing outside with naked eye I could only see a few bright stars, and absolutely no trace of the milky way. It was a very moist night, with hints of fog in a few spots, so pretty much the worst case scenario for trying to use this camera. Click on the images for a more detailed view.
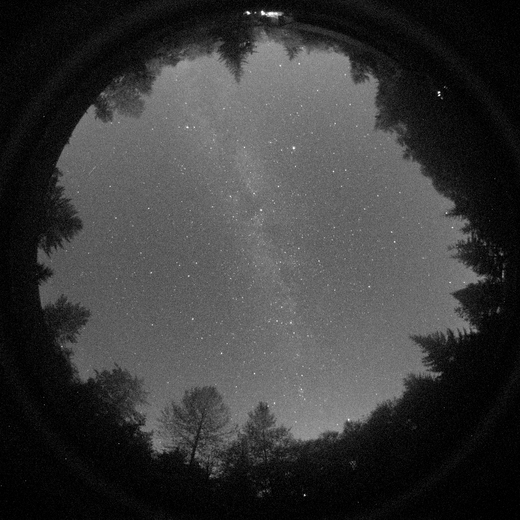
For comparison, the same stretch applied to an image taken on a very good night, clear sky with no moon. In the past I always trimmed the edges off of these images because any bright ground lights would affect the automated stretching so badly that stars and milky way were not visible. Going forward now, we can display the full images including any ground lights, and still get a very good representation of the sky.

I’m really happy with this result, because now the all-sky images will be useable most of the time, whereas in the past, they were essentially unusable on nights with a moon in the sky.
The processing of these involves a few step, first we shrink the image to 50% size and then apply a gamma, and finally apply a stretch. The end result is something that fits nicely on a web page for the real-time status displays.
The main drawback to this method of processing is how it affects daytime images, when the sun hits the camera directly, this camera will bloom, and this type of image stretch will magnify the blooms. At this point, we are not really concerned with daytime images, so that is a problem to be filed away for another time. I have a strategy in mind that should allow us to extract decent daytime images from this camera, but it’s a fair amount of work and will have to wait for now.